Showing posts with label Objective C. Show all posts

Saturday, January 21, 2017

Xcode 8.2 Simulator Crash When Save Screen Shot - Alternate way to take Screenshot of iPhone simulator

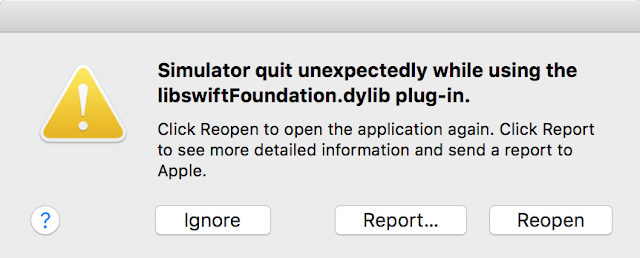
I don't know what went wrong with my Xcode. Recently I was publishing an app in iTunes connect and for that I needed iPhone 7 screen shot. I opened simulator and run and app and tried to capture screenshot with Command + S and it crashed the simulator with following error and screen shot file was empty.


It shows some error related to some library of SwiftFoundation. I was not sure about this error. So first thing what I did is report it to apple and then tried few things like. Restarting simulator couple of times and restarting Xcode couple of times. But it didn't work. So may be it's related to SDK update. I updated the latest SDK but still it was not working. So at last I give it to Apple to solve the problem but I needed that screen shot. So here is alternate way to take Screenshot of iPhone simulator.

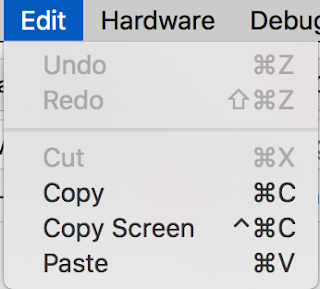
With simulator running. Select Go to Edit menu and Select Copy Screen.


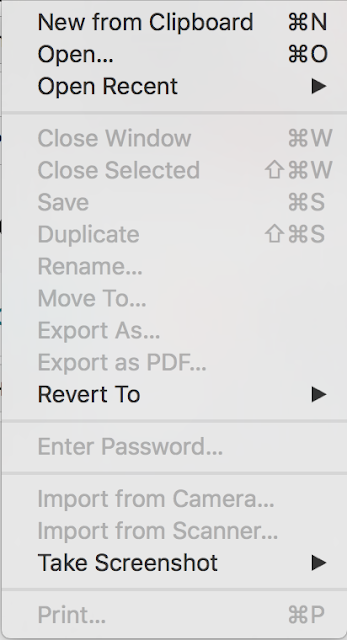
This will copy current screen of simulator. Now open the preview and go to File and Select New From Clipboard.


And it will give you new image with copied screen of your simulator, now save it and use it with Preview. Hope this helps you.

Saturday, January 14, 2017

AVCaptureVideoPreviewLayer Black Screen. AVfoundation Black Screen on Record

Recently in one of my project we used AVFoundation to record video. In some of the iOS devices, we were getting issue that on start recording, it shows black screen and video is not recorded. After some investigation I found out that it's because user has manually revoked camera access from settings so it was not woking. So to solve this issue, you must check if the permission is there or not. If not first request permission and if it's denied, so message to user.

So here is the function you should use. You should call this function, before you start recording and check if there is necessary permission.

- (void)requestCameraPermissionsIfNeeded {
   
    NSLog(@"requestCameraPermissionsIfNeeded");
    // check camera authorization status
    AVAuthorizationStatus authStatus = [AVCaptureDevice authorizationStatusForMediaType:AVMediaTypeVideo];
    switch (authStatus) {
        case AVAuthorizationStatusAuthorized: { // camera authorized
            NSLog(@"requestCameraPermissionsIfNeeded camera authorized");
            // do camera intensive stuff
        }
            break;
        case AVAuthorizationStatusNotDetermined: { // request authorization
            NSLog(@"requestCameraPermissionsIfNeeded have to ask user again");
            [AVCaptureDevice requestAccessForMediaType:AVMediaTypeVideo completionHandler:^(BOOL granted) {
                dispatch_async(dispatch_get_main_queue(), ^{
                   
                    if(granted) {
                        // do camera intensive stuff
                    } else {
                       
                        NSLog(@"STOP RECORDING");
                        WeAreRecording = NO;
                        ShareVideo = YES;
                        [MovieFileOutput stopRecording];
                        //Prompt message to user.
                    }
                });
            }];
        }
            break;
        case AVAuthorizationStatusRestricted:{
            NSLog(@"STOP RECORDING");
            WeAreRecording = NO;
            ShareVideo = YES;
            [MovieFileOutput stopRecording];
            //Prompt message to user.
        }
           
        case AVAuthorizationStatusDenied: {
            NSLog(@"STOP RECORDING");
            WeAreRecording = NO;
            ShareVideo = YES;
            [MovieFileOutput stopRecording];
            //Prompt message to user.
            dispatch_async(dispatch_get_main_queue(), ^{
            });
        }
            break;
        default:
            break;
    }
}


This will help you in identifying issue and display proper message to user.

Monday, December 19, 2016

Objective C - Record Video With AVCaptureSession

Hello,

In this blog I am going to explain how to record video with AVCaptureSession in your iOS application.

First of all add following import statements in your view controller header file.

#import <Foundation/Foundation.h>
#import <CoreMedia/CoreMedia.h>
#import <AVFoundation/AVFoundation.h>
#import <AVKit/AVKit.h>
#import <AVFoundation/AVFoundation.h>
#import <AssetsLibrary/AssetsLibrary.h>

Now we will have to set preview layer for the recording in our view and also we will need input device and output file location. Also we need to add AVCaptureFileOutputRecordingDelegate to have notifications of events like recording stop.

Implement this delegate in your header file.

@interface MainViewController : CDVViewController
{
    BOOL WeAreRecording;
    BOOL ShareVideo;
    AVCaptureSession *CaptureSession;
    AVCaptureMovieFileOutput *MovieFileOutput;
    AVCaptureDeviceInput *VideoInputDevice;
}

Now we will set preview layer and init AVCaptureSession in viewDidLoad and set input and output.

CaptureSession = [[AVCaptureSession alloc] init];
AVCaptureDevice *VideoDevice = [AVCaptureDevice defaultDeviceWithMediaType:AVMediaTypeVideo];
AVCaptureDevice *audioCaptureDevice = [AVCaptureDevice defaultDeviceWithMediaType:AVMediaTypeAudio];
NSError *error = nil;
AVCaptureDeviceInput *audioInput = [AVCaptureDeviceInput deviceInputWithDevice:audioCaptureDevice error:&error];
if (audioInput)
{
[CaptureSession addInput:audioInput];
}

[self setPreviewLayer:[[AVCaptureVideoPreviewLayer alloc] initWithSession:CaptureSession]];
PreviewLayer.orientation = AVCaptureVideoOrientationLandscapeRight;
[[self PreviewLayer] setVideoGravity:AVLayerVideoGravityResizeAspectFill];

Now we will setup output file and video recording settings and image quality.

MovieFileOutput = [[AVCaptureMovieFileOutput alloc] init];
Float64 TotalSeconds = 60;
int32_t preferredTimeScale = 30;
CMTime maxDuration = CMTimeMakeWithSeconds(TotalSeconds, preferredTimeScale);
MovieFileOutput.maxRecordedDuration = maxDuration;
MovieFileOutput.minFreeDiskSpaceLimit = 1024 * 1024;
   
if ([CaptureSession canAddOutput:MovieFileOutput])
    [CaptureSession addOutput:MovieFileOutput];
   
[self CameraSetOutputProperties];

[CaptureSession setSessionPreset:AVCaptureSessionPresetMedium];
if ([CaptureSession canSetSessionPreset:AVCaptureSessionPreset640x480])
    [CaptureSession setSessionPreset:AVCaptureSessionPreset640x480];
   
CGRect layerRect = [[[self view] layer] bounds];
CGRect viewBoundsPreview = [self.webView bounds];
viewBoundsPreview.origin.y = 20;
viewBoundsPreview.size.height = viewBoundsPreview.size.height - 40;
[PreviewLayer setBounds:viewBoundsPreview];
[PreviewLayer setPosition:CGPointMake(CGRectGetMidX(layerRect),
 CGRectGetMidY(layerRect))];

UIView *CameraView = [[UIView alloc] init];
[[self view] addSubview:CameraView];
[self.view sendSubviewToBack:CameraView];
[[CameraView layer] addSublayer:PreviewLayer];
[CaptureSession startRunning];

Now capture session is running, we have to start and stop recording.

To start recording, add following code to your handler.

NSTimeInterval timeStamp = [[NSDate date] timeIntervalSince1970];
NSNumber *timeStampObj = [NSNumber numberWithInteger:timeStamp];
NSString* fileName = [timeStampObj stringValue];
fileName = [fileName stringByAppendingString:@".mov"];
NSString *outputPath = [[NSString alloc] initWithFormat:@"%@%@", NSTemporaryDirectory(), fileName];
NSURL *outputURL = [[NSURL alloc] initFileURLWithPath:outputPath];
NSFileManager *fileManager = [NSFileManager defaultManager];
if ([fileManager fileExistsAtPath:outputPath])
{
NSError *error;
if ([fileManager removeItemAtPath:outputPath error:&error] == NO)
{
//Error - handle
}
}
//Start recording
[MovieFileOutput startRecordingToOutputFileURL:outputURL recordingDelegate:self];


Above code will start recording. Add following code to stop recording.

[MovieFileOutput stopRecording];

This will stop recording and save video to Photos library.

Friday, December 16, 2016

Objective C - Play Video From Application Temp Folder

Recently in one of my iOS project , there was requirement to play Video stored in temporary folder of Application data. After some hours of struggle I managed to get it working.

So the problem I was facing is I have absolute URL of the video that I was trying to play in MPMoviePlayerController but it was not working as the player was displayed for couple of seconds and it's dismissed automatically and there was a black screen.

So after sometime I found out that MPMoviePlayerController is deprecated, instead of it we shall use AVPlayer and that too was not working if I give absolute path to initialize a player. So first of all I just extracted file name fro the absolute path will following code.

NSRange range = [filePath rangeOfString:@"/" options:NSBackwardsSearch];
NSUInteger index = range.location;      
filename = [filePath substringFromIndex:index+1];

Now we will initialize player. Please note you have to import AVKIt first in your header file.

#import <AVKit/AVKit.h>

Now initialize player.

NSString *outputPath = [NSTemporaryDirectory() stringByAppendingPathComponent:filename];
AVAsset *asset = [AVAsset assetWithURL:[NSURL fileURLWithPath:outputPath]];
AVPlayer *_avPlayer = [[AVPlayer alloc]initWithPlayerItem:[[AVPlayerItem alloc]initWithAsset:asset]];

movieLayer = [AVPlayerLayer playerLayerWithPlayer:_avPlayer];
movieLayer.frame = self.view.bounds;
[self.view.layer addSublayer:movieLayer];

So player will be added as sublayer on the view so we have to dismiss it when video finished playing.

[[NSNotificationCenter defaultCenter] addObserver:self
selector:@selector(videoDidFinish:)
name:AVPlayerItemDidPlayToEndTimeNotification
  object:[_avPlayer currentItem]];

And add callback function to remove player layer.

- (void)videoDidFinish:(id)notification
{
    NSLog(@"finsihed");
    [movieLayer removeFromSuperlayer];
    [[NSNotificationCenter defaultCenter] removeObserver:self];
}


That's it. Hope this will help you.

Saturday, January 2, 2016

Resolve App Transport Security Exceptions in iOS 9 and OSX 10.11

Hello,

Recently I was working on an old iOS application for my client. This app was developed on iOS 7 and we were adding few updates, I was using iOS 9 SDK on my Xcode. While development I found that none of the web services were working on app. In short app was not able to get data from remote URLs. I show the logs and there was App Transport Security Exception.

Let's first understand what is App Transport Security (ATS).

At WWDC 2015, Apple announced “App Transport Security” for iOS 9 and OSX 10.11 El Capitan. The “What’s New in iOS” guide for iOS 9 explains:

App Transport Security (ATS) lets an app add a declaration to its Info.plist file that specifies the domains with which it needs secure communication. ATS prevents accidental disclosure, provides secure default behavior, and is easy to adopt. You should adopt ATS as soon as possible, regardless of whether you’re creating a new app or updating an existing one.

If you’re developing a new app, you should use HTTPS exclusively. If you have an existing app, you should use HTTPS as much as you can right now, and create a plan for migrating the rest of your app as soon as possible.

In simple terms, this means that if your application attempts to connect to any HTTP server (in this example, yourserver.com) that doesn’t support the latest SSL technology (TLSv1.2), your connections will fail with an error like this:

CFNetwork SSLHandshake failed (-9801)
Error Domain=NSURLErrorDomain Code=-1200 "An SSL error has occurred and a secure connection to the server cannot be made." UserInfo=0x7fb080442170 {NSURLErrorFailingURLPeerTrustErrorKey=, NSLocalizedRecoverySuggestion=Would you like to connect to the server anyway?, _kCFStreamErrorCodeKey=-9802, NSUnderlyingError=0x7fb08055bc00 "The operation couldn’t be completed. (kCFErrorDomainCFNetwork error -1200.)", NSLocalizedDescription=An SSL error has occurred and a secure connection to the server cannot be made., NSErrorFailingURLKey=https://yourserver.com, NSErrorFailingURLStringKey=https://yourserver.com, _kCFStreamErrorDomainKey=3}

In short app should have all the remote calls with Https protocol. How ever in my case it was not possible as my client refused to install SSL certificate. So I have to bypass App Transport Security.

So here how to do this. Open your project in Xcode and open info.plist file and add following key.

App Transport Security Settings


Now add one more key under that key which you added above. Following is the name of key.

Allow Arbitrary Loads and set it's value to YES. After adding both keys your info.plist should look as below.


That's it and now all your services should work with http protocols.


Sunday, May 3, 2015

Add iOS in App Purchase to Your Cordova Application

Hello,

Recently I was working on cordova application where we have to add in app purchase in iOS. In this blog I am going to explain how to add in app purchase to cordova based application.

First of all open your MainViewController.m file and un comment following function.


- (BOOL) webView:(UIWebView*)theWebView shouldStartLoadWithRequest:(NSURLRequest*)request navigationType:(UIWebViewNavigationType)navigationType

As we are going to use above function to pass product id to native code from JavaScript with use of this function. Here is how to do this. From your JavaScript file add following code.

window.location.href = 'http://buyproduct.com?productId='+sku.toLowerCase();

This will invoke shouldStartLoadWithRequest delegate. Now in that delegate add following code.

NSURL *url = [request URL];
if([[url hostisEqual: @"buyproduct.com"]){
        NSString *queryString = url.query;
        NSArray* queryStringValues = [queryString componentsSeparatedByString: @"&"];
        NSString* productId = [[[queryStringValues objectAtIndex:0] componentsSeparatedByString: @"="] objectAtIndex:1];
       return NO;
}

This way we get product id in native code and since we returned NO in that delegate, webview will not invoke this url.

Now let's add required library to support in App Purchase. First select project from project explorer and select build phases tab. At bottom where we have linked libraries click on + sign and search for storekit. It will show following framework. Add this to project.


Now open MainViewController.h file and add necessary import statements and delegates. Copy following code.

#import
#import
#import
#import

@interface MainViewController : CDVViewController <SKProductsRequestDelegate, UIAlertViewDelegate, SKPaymentTransactionObserver>
@property (retain, nonatomic) SKProduct* fetchedProduct;
@end
@interface MainCommandDelegate : CDVCommandDelegateImpl
@end

@interface MainCommandQueue : CDVCommandQueue
@end

Now open MainViewController.m file and add necessary callbacks.

#pragma mark -
#pragma mark SKProductsRequestDelegate methods

- (void)productsRequest:(SKProductsRequest *)request didReceiveResponse:(SKProductsResponse *)response
{
    
}

- (void)alertView:(UIAlertView *)alertView clickedButtonAtIndex:(NSInteger)buttonIndex
{
    [[SKPaymentQueue defaultQueue] addTransactionObserver:self];
    SKPayment * payment = [SKPayment paymentWithProduct:fetchedProduct];
    [[SKPaymentQueue defaultQueue] addPayment:payment];
}

- (void)paymentQueue:(SKPaymentQueue *)queue updatedTransactions:(NSArray *)transactions
{
    for (SKPaymentTransaction * transaction in transactions) {
        switch (transaction.transactionState)
        {
            case SKPaymentTransactionStatePurchased:
                [self completeTransaction:transaction];
                break;
            case SKPaymentTransactionStateFailed:
                [self failedTransaction:transaction];
                break;
            case SKPaymentTransactionStateRestored:
                [self restoreTransaction:transaction];
            default:
                break;
        }
    };
}

- (void)completeTransaction:(SKPaymentTransaction *)transaction {
    
}

- (void)restoreTransaction:(SKPaymentTransaction *)transaction {
    NSLog(@"restoreTransaction...");
    //call javascript function to consume product only
    [[SKPaymentQueue defaultQueue] finishTransaction:transaction];
}

- (void)failedTransaction:(SKPaymentTransaction *)transaction {
    
    NSLog(@"failedTransaction...");
    if (transaction.error.code != SKErrorPaymentCancelled)
    {
        NSLog(@"Transaction error: %@", transaction.error.localizedDescription);
    }
    
    [[SKPaymentQueue defaultQueue] finishTransaction: transaction];
}

This are necessary functions to support transactions and product request. Now lets first request a product information. Go back to shouldStartLoadWithRequest and add following code at the end.

BOOL productPurchased = [[NSUserDefaults standardUserDefaults] boolForKey:productId];
        if (productPurchased) {
            //call javascript function to consume product
            [self.webView stringByEvaluatingJavaScriptFromString:@"consumePurchasedProduct();"];
        }else{
            SKProductsRequest *productsRequest = [[SKProductsRequest alloc] initWithProductIdentifiers:productIdentifiers];
            productsRequest.delegate = self;
            [productsRequest start];
        }

Here we are checking if product already purchased. If already purchased simply call JavaScript function to consume it else start product request. After we get product information we have to show it to user.  Add following code to productRequest delegate.

NSArray *products = response.products;
    fetchedProduct = [products count] == 1 ? [products firstObject] : nil;
    if (fetchedProduct)
    {
        NSLog(@"Product title: %@" , fetchedProduct.localizedTitle);
        NSLog(@"Product description: %@" , fetchedProduct.localizedDescription);
        NSLog(@"Product price: %@" , fetchedProduct.price);
        NSLog(@"Product id: %@" , fetchedProduct.productIdentifier);
        
        NSNumberFormatter *formatter = [[NSNumberFormatter alloc] init];
        [formatter setNumberStyle:NSNumberFormatterCurrencyStyle];
        [formatter setLocale:[NSLocale currentLocale]];
        NSString *localizedMoneyString = [formatter stringFromNumber:fetchedProduct.price];

        NSString *productPrice = @"Price : ";
        productPrice = [productPrice stringByAppendingString:localizedMoneyString];
        NSString* alertViewContent = fetchedProduct.localizedDescription;
        alertViewContent = [alertViewContent stringByAppendingString:@"\n \n"];
        alertViewContent = [alertViewContent stringByAppendingString:productPrice];
        UIAlertView * alert = [[UIAlertView alloc] initWithTitle:fetchedProduct.localizedTitle message:alertViewContent delegate:self cancelButtonTitle:@"Buy" otherButtonTitles:nil];
        [alert show];
    }

Above function will show alert like this with product information.


As you can see we have a buy button there. When user clicks on Buy it will call clickedButtonAtIndex function added in above code and it will start payment process. One payment is done it will call completeTransaction delegate. Add following code to it.

NSLog(@"completeTransaction...");
    [[NSUserDefaults standardUserDefaults] setBool:YES forKey:fetchedProduct.productIdentifier];
    //call javascript function to consume product
    [self.webView stringByEvaluatingJavaScriptFromString:@"consumePurchasedProduct();"];
    [[SKPaymentQueue defaultQueue] finishTransaction:transaction];

Here we are adding product to user defaults in case network got disconnected before user can consume product. In case of transaction failure other functions will be called.
Tuesday, March 3, 2015

Cocoa OSX NSTextField Allow Only Integer Value

Hello,

Recently I was working on MAC OSX application where we have a view with some textfields. Where in few textfields where only numeric values are allowed. In this blog I will explain how to do this.

I used NSNumberFormatter for that. First you have to create a class which extends NSNumberFormatter.

Go to your .m file and add new interface.

@interface OnlyIntegerValueFormatter : NSNumberFormatter


@end

Now implement this interface in same file.

@implementation OnlyIntegerValueFormatter

- (BOOL)isPartialStringValid:(NSString*)partialString newEditingString:(NSString**)newString errorDescription:(NSString**)error
{
    if([partialString length] == 0) {
        return YES;
    }
    
    NSScanner* scanner = [NSScanner scannerWithString:partialString];
    
    if(!([scanner scanInt:0] && [scanner isAtEnd])) {
        NSBeep();
        return NO;
    }
    
    return YES;
}

@end

That's it. Now create instance of OnlyIntegerValueFormatter and assign it to NSTextField. 

OnlyIntegerValueFormatter *formatter = [[OnlyIntegerValueFormatter alloc] init];
[self.onlyIntegerTextField setFormatter:formatter];

That's it. Now if you try to type characters in the textfield, it won't allow it. 

Thursday, February 19, 2015

iOS Cordova Get Device Name

Hello,

Recently in one of my iOS app project, I had a requirement to get device name like "Hiren's iPhone". First I thought it's pretty simple as I checked device API documentation and saw that there is method device.name which should gave device name. I tried that and surprisingly it was returning undefined. I was not sure why it's not returning result. Then I saw source code and found out actually name property is not added in device API so I decided to add it. In this blog I am going to explain how to do this.

First open your CDVDevice.m file and find following function.


- (NSDictionary*)deviceProperties

In this function add following new line. 

[devProps setObject:[device name] forKey:@"name"];

That's it on objective C side. Now lets modify on JavaScript side. Open device.js file inside plugins/org.apache.cordova.device folder in your www folder. There is a constructor function 

function Device()

In this function first add name property. 

this.name = null;

And inside following function initialize this property.

channel.onCordovaReady.subscribe(function() {
        me.getInfo(function(info) {
        }
}

me.name = info.name;

That's it and now device.name should return your name of device set in settings.

Tuesday, February 17, 2015

iOS Today App Extension Widget Tap To Open Containing App

Hello,

Recently I added Today App Extension to one of my iOS app. In that we have a requirement to open containing app when user taps anywhere in app extension view. In this blog I am going to explain how to do this. First you have to add tap gesture recognizer to your main container view. In my case I had UIView as base container view. Inside this view I have added all other views.

So first create iboutlet property for that view. Now create Single Tap Gesture Recognizer.

UITapGestureRecognizer *singleFingerTap =
    [[UITapGestureRecognizer alloc] initWithTarget:self
                                            action:@selector(handleSingleTap:)];

[mainContainerView addGestureRecognizer:singleFingerTap];

As seen in above code, first we created singleFingerTap recognizer and added this as gesture recognizer to mainContainerView. Now add following function which we mentioned in selector.

- (void)handleSingleTap:(UITapGestureRecognizer *)recognizer {
    NSURL *pjURL = [NSURL URLWithString:@"AppUrlType://home"];
    [self.extensionContext openURL:pjURL completionHandler:nil];
}

That's it. Simple.. isn't it? But wait, it won't work as we have to add URL type in our app. In iOS you can define custom URL schemes and URL types for your app. Using which you can open your app from browser or from some other app using openURL function as shown above in code. So let's add custom URL type for your app.

Open plist file of your main app and add new item with name URL types, expand item 0 of it and add new item with name URL Schemes. Expand item 0 of URL Schemes and add  "
AppUrlType" as a value. For your application, you can use any valid name. After adding this, you should have following structure in your plist file.


That's it. Now select your App Extension Target and run the widget. Tap anywhere in your widget and it will open your containing app. 

iOS App UI not updating in Main Thread

Hello,

Recently in one of my projects, I faced a very strange issue. I have an http service call in app which was in background which brings some data. I want to show those data in Textviews in UI. Now the issue was it was not updating UI properly. I had five textviews and five strings in five variables. Out of which it was updating only one Textviews. Rest of the views were not updated. I was not sure what was the issue here as I was updating UI on main thread but still it was not working. See the below code.


NSString *value1 = [jsonArray objectForKey:@"key1"];
NSString *value2 = [jsonArray objectForKey:@"key2"];
NSString *value3 = [jsonArray objectForKey:@"key3"];
NSString *value4 = [jsonArray objectForKey:@"key4"];
NSString *value5 = [jsonArray objectForKey:@"key5"];

As you see in above code I set five variables from my array which were created from JSON response of web service. Now I used dispatch_async to go on Main thread and set values to Text views.

dispatch_async(dispatch_get_main_queue(), ^{
       [txt1 setText:value1];
       [txt2 setText:value2];
       [txt3 setText:value3];
       [txt4 setText:value4];
       [txt5 setText:value5];
});

As I mentioned an issue above that, it was setting value of only first text views. Others were blank. So I was not sure what was the issue. Later I realized that it was nil problem. Since I used local variables to store data, by the time my code inside dispatch_async runs, the scope of those variables were destroyed and there was a nil value. So other text views were blank.

So the solution was to keep variable initialization inside  dispatch_async method. See the below code.

dispatch_async(dispatch_get_main_queue(), ^{
       NSString *value1 = [jsonArray objectForKey:@"key1"];
       NSString *value2 = [jsonArray objectForKey:@"key2"];
       NSString *value3 = [jsonArray objectForKey:@"key3"];
       NSString *value4 = [jsonArray objectForKey:@"key4"];
       NSString *value5 = [jsonArray objectForKey:@"key5"];

       [txt1 setText:value1];
       [txt2 setText:value2];
       [txt3 setText:value3];
       [txt4 setText:value4];
       [txt5 setText:value5];
});

That's it, it worked. After having initialization inside  dispatch_async method, all the text views values were displayed properly. Hope this will help you and save you time.

iOS Share Data Between iOS App and Today Widget (App Extension)

Hello,

Recently in one of my projects I implemented a Today Widget for the iOS application. While working on that I faced a situation where I have to get data stored in User Defaults of Main app to Today Widget. In this blog I am going to explain how you can sync data between app and widget.  In my case it was simple string data that was stored in user defaults.

For this, first you need to create an app group from Xcode. App group is group of apps which contains main app and an extension. When you create a group from Xcode, it will also create a group in developer portal. For that, first click on project in project explorer and select your main app target in Xcode and go to Capabilities - > App Groups. Initially app groups will be off, first you have to make it on and it will show a pop up window where you can create a new group. Group name always starts with group. prefix. See the image below.


Add your new group like this: group.companyname.groupname and click on Ok. It will sync with developer portal and create app group. Now select your app extension target and go to Capabilities - > App Groups. It will be off first. On it and it will sync with existing app groups which we created in first step. Add your app extension to this group. That's it. Now you can share data between app and app extensions. Now you have to add data by creating group defaults and saving data to groups. See the following code.  This code you can add to your main app.

NSUserDefaults *shared = [[NSUserDefaults alloc]initWithSuiteName:@"group.company.GroupDefaults"];
[shared setObject:[defaults objectForKey:@"key1"] forKey:@"value1"];
[shared setObject:[defaults objectForKey:@"key2"] forKey:@"value2"];
[shared synchronize];

As you can see in above code, we have created NSUserDefaults class instance with suite name or the group. Every time after adding objects to NSUserDefaults, you have to synchronize it. Else data will not be saved. Add following code to your app extension where you want to read data. 

NSUserDefaults *shared = [[NSUserDefaults alloc]initWithSuiteName:@"group.company.GroupDefaults"];
self.value1 = [shared objectForKey:@"key1"];
self.value2 = [shared objectForKey:@"key2"];

Also you can save other data in app extension and can read it in main app. 

[shared setObject:[defaults objectForKey:@"key3"forKey:@"value3"];
[shared setObject:[defaults objectForKey:@"key4"forKey:@"value4"];
[shared synchronize];

As I mentioned above, every time you have to sync after adding or modifying data in user defaults. Hope this will help you.


Friday, October 12, 2012

How to add Tap Event to UIImageView in XCode?

Hello,

This blog post is about adding tap event to UIImageView dynamically.

Here we can use UITapGestureRecognizer class. Checkput the following code.


UITapGestureRecognizer *tap = [[UITapGestureRecognizer alloc] initWithTarget:self action:@selector(handleImageTap:)];
        tap.cancelsTouchesInView = YES;
        tap.numberOfTapsRequired = 1;

Above code is to identify single tap on image. If you want to do it for double tap just increase the count by one in numberOfTapsRequired.

Now let's create our image view.

NSString *urlString = @"http://myurl.com/image.jpg";
NSURL *url = [NSURL URLWithString:urlString];
NSData *imageData = [NSData dataWithContentsOfURL:url];
UIImage *image = [UIImage imageWithData:imageData];
UIView* mainServiceView = [[UIView alloc] initWithFrame:CGRectMake(0, 0, 200, 200)];
UIImageView* imageView = [[UIImageView alloc] initWithImage:image];
imageView.userInteractionEnabled =TRUE;

Here note the last line imageView.userInteractionEnabled =TRUE; This is necessary else it will not respond to any gesture. Now add a gesture to image

[imagView addGestureRecognizer:tap];

Also add handleImageTap function to your view controller file.

- (void) handleImageTap:(UIGestureRecognizer *)gestureRecognizer {
    UIView* view = gestureRecognizer.view;
    //object of view which invoked this 
}


That's it now user can tap on your image.

Hope this helps you.


XCode- Send data and Close Popover from Master View Controller

Hello,

Recently I was working on the app, where there was a button in toolbar which opens the Pop over with a table view. After selecting table cell, we need to pass some information to master view controller and close the Popover.

First you need a reference in your master view controller. Add following to your View controller header file.


@property (nonatomic, strong) UIPopoverController *myPopOver;

Synthesize it in .m file.

@implementation masterViewController

@synthesize myPopOver; 
@end

Now add prepareForSegue method.

-(void) prepareForSegue:(UIStoryboardSegue *)segue sender:(id)sender
   
    if([segue.identifier isEqualToString:@"popOverSegue"]){
        UIStoryboardPopoverSegue *popoverSegue = (UIStoryboardPopoverSegue *)segue;
        self.myPopOver = popoverSegue.popoverController;
        [segue.destinationViewController setDelegate:self];
    }
    
}


Also add one call call back method in your master view controller, which will be invoked when user selects a cell in pop over table view.

-(void)myCallBack{
}

Now in pop over table view controller import your master view controller and set delegate as follow.

#import
#import "masterViewController.h"

@interface myPopOverController : UITableViewController 
@property (nonatomic, weakmasterViewController* delegate;
@end

Add following code to .m file

#import "myPopOverController.h"
#import "masterViewController.h"

@interface  myPopOverController ()<UITableViewDelegate>

@end

@implementation iPadCategoriesPopOver
@synthesize categoriesArray,categoriesTableView,delegate;

- (void)tableView:(UITableView *)tableView didSelectRowAtIndexPath:(NSIndexPath *)indexPath
{
    
        [[self delegatemyCallBack];
    
}


@end
Check above code carefully, here we have delegate of type mater view controller and using it to invoke our call back function, Above code is executed when some one selects a row from table view. Now add following code to myCallBack function to close the pop over.

[self. myPopOver dismissPopoverAnimated:YES];

Also note that you can pass any parameter in callback if you want.

Hope this helps you.


Parse JSON data in Objective C (iOS 5)

Hello,

Recently I was working on native iPAD app where we were having certain APIs which returns JSON data. This blog is about parsing JSON data in Objective C.

Following is the code to send request.


NSString *serviceURI = @"http://myapiturl.com";
    serviceURI = [serviceURI stringByAppendingString:sort];
    NSMutableURLRequest *request = [[NSMutableURLRequest alloc] init];
    [request setURL:[NSURL URLWithString:serviceURI]];
    [request setHTTPMethod:@"GET"];
    NSString *contentType = [NSString stringWithFormat:@"application/json"];
    [request addValue:contentType forHTTPHeaderField: @"Content-Type"];
    [request addValue:@"application/json" forHTTPHeaderField: @"Accept"];

dispatch_queue_t queue = dispatch_get_global_queue(DISPATCH_QUEUE_PRIORITY_DEFAULT, 0ul);
    dispatch_async(queue, ^{
        NSURLResponse *response = nil;
        NSError *error = nil;
        
        NSData *receivedData = [NSURLConnection sendSynchronousRequest:request
                                                     returningResponse:&response
                                                                 error:&error];
        if(receivedData==nil){
            [SerenaNotifications showNetworkNotifcations];
        }else{
        }
});

Please note that here we are using GCD (grand central dispatch) I will explain this in other blog post. We will get our JSON data in receivedData variable. iOS 5 gives native classes for JSON serialization. Following code will go in else loop.

NSError *myError = nil;
            NSDictionary *res = [NSJSONSerialization JSONObjectWithData:receivedData options:NSJSONReadingMutableLeaves error:&myError];
            NSArray *resultArray = [res objectForKey:@"results"];

Normally in JSON request, results are added with results key. In your case if key is different, replace it in place of results.

This will give you all the results. If you have a single value in key you can access it as follow.

NSString* value = [object valueForKey:@"key"];

If you want to convert it to integer value. Use following code.

NSInteger intValue = [[object valueForKey:@"value"] intValue];


If you want to convert it to boolean value, use following code.

bool boolValue = [[object valueForKey:@"value"] boolValue];

Now you have all the results in resultArray. How to iterate through it and get a single object? Check the following code.

 NSEnumerator *e = [resultArray objectEnumerator];
            
            NSDictionary *object;
            while (object = [e nextObject]) {
             }

Object is the NSDictionary object having your single result object. Again you can use objectForKey and valueForKey methods of NSDictionary class in case you have nested JSON structure.

Hope this post helps you.


iOS Pass Values to Native App from JavaScript in Webviews (Xcode)

Hello,

Recently I was working on a native iOS application for iPAD. There are several web views in app which loads some sencha touch forms in web views. Web views are in modal window. Requirement was to notify native app to close web views upon certain user actions.  So how to do that?  Here is the trick

Add following to your modal view controller header file.


#import

@interface iPadCatalogFormMoalController : UIViewController{
    IBOutlet UIWebView *webView;
}
@property (nonatomic, retain) UIWebView *webView;
@property (nonatomic) IBOutlet UIActivityIndicatorView  *webviewLoadingIndicator;
@end

Now synthesize this properties in .m file

@synthesize webView,webviewLoadingIndicator;

Following code should be added in viewDidLoad method.

    NSString *urlAddress = @"http://myappurl.com";
    
    NSURL *url = [NSURL URLWithString:urlAddress];
    
    NSURLRequest *requestObj = [NSURLRequest requestWithURL:url];

    webView.delegate= self;
    [self.webView loadRequest:requestObj];

Now add few delegate functions for web views.

-(void)webViewDidStartLoad:(UIWebView *)webView{
    [webviewLoadingIndicator startAnimating];
}

-(void)webViewDidFinishLoad:(UIWebView *)webView{
    [webviewLoadingIndicator stopAnimating];
}

- (BOOL)webView:(UIWebView*)webView shouldStartLoadWithRequest:(NSURLRequest*)request navigationType:(UIWebViewNavigationType)navigationType {
    NSURL *URL = [request URL]; 
    if ([[URL scheme] isEqualToString:@"closeWebView"]) {
        // parse the rest of the URL object and execute functions
        [self dismissModalViewControllerAnimated: YES];
        return NO;
    } 
    return YES;
}

Most important function for is the third one. This is called when web view url is assigned. Here we can check url schemes and do the necessary action. 

Now in your JS code when you want to notify native app. Just add following code.

window.location.href = 'closeWebView://param=value';

Here when you add this it will again fire shouldStartLoadWithRequest delegate function of web view and there we are checking the the URL scheme. 

Also you can pass ay number of params to native app if needed. Please note that this isn't the most efficient method. But it works in major scenarios.

Hope this helps you.


Saturday, September 1, 2012

Send HTTP Request and retrive HTTP response in iPhone, iPad Application

Hello,

Recently I was working on an iPhone application where requirement was to send HTTP request and retrieve the response. This was not a JSON or restful web service. Checkout the following code.


 NSMutableString* url = [NSMutableString string];
    [url appendString:@"http://www.example.com"];
    NSURLRequest *theRequest=[NSURLRequest requestWithURL:[NSURL URLWithString:url]
                                              cachePolicy:NSURLRequestUseProtocolCachePolicy
                                          timeoutInterval:60.0];
    NSURLConnection *theConnection=[[NSURLConnection alloc] initWithRequest:theRequest delegate:self];
    if (theConnection) {
        
        
    } else {
        UIAlertView* alertView = [[UIAlertView alloc] initWithTitle:@"Failed" message:@"Check your networking configuration." delegate:self cancelButtonTitle:@"OK" otherButtonTitles:nil];
        [alertView show];
    }

Above code will initiate the connection. If it's successful it will go in if part else it will go in else part. On successful connection we have to retrive the data so we will add few delegates functions for it.

- (void)connection:(NSURLConnection*)connection didReceiveResponse:(NSURLResponse*)response {
    NSHTTPURLResponse* httpResponse = (NSHTTPURLResponse*)response;
       if ([httpResponse statusCode] >= 400) {
        // do error handling here
           UIAlertView* alertView = [[UIAlertView alloc] initWithTitle:@"Failed" message:@"Check your networking configuration." delegate:self cancelButtonTitle:@"OK" otherButtonTitles:nil];
           [alertView show];
    } else {
        // start recieving data
    }
}

This function will be invoked when we have response. After we get response we will start fetching data. There is a separate delegate function for it.

-   (void)connection:(NSURLConnection *)connection didReceiveData:(NSData *)theData{
    NSString *response = [[NSString alloc] initWithData:theData encoding:NSUTF8StringEncoding];

Above function will be invoked when we will have real data. Here response will give us data in string format.

Hope this helps.