Showing posts with label iOS. Show all posts

Saturday, July 13, 2019

Swift - Notify ViewController from AppDelegate On FCM / APN

Hello,

Recently I tried  my hands on iOS app after long time as I had to convert one of our hybrid app to native app on urgent basis. There I had webview where I was loading my html app. On FCM message receieved we need to send URL received in FCM to webview and load the URL.

So here in this blog I will mention the procedure for it.

First of all in AppDelegate we have didReceiveRemoteNotification method. There we will create notification for it. Here is the code.


let url = dict
serverURL = url;
let notificationName = Notification.Name("updateWebView")
NotificationCenter.default.post(name: notificationName, object: nil)

Now in the ViewController where you want to make updates, subscribe to this notification in viewDidLoad function.

override func viewDidLoad() {
  let notificationName = Notification.Name("updateWebView")
  NotificationCenter.default.addObserver(self, selector:            #selector(ViewController.updateWebView), name: notificationName, object: nil)
}

And then add function in ViewController.

@objc func updateWebView() {
  let appDelegate = UIApplication.shared.delegate as! AppDelegate
  let serverURL = appDelegate.serverURL
        
  guard let url = URL(string: serverURL!) else {
     print("Invalid URL")
     return
  }
        
  let request = URLRequest(url: url)
  webView.load(request)
}

That's it and now you will have data passed from AppDelegate to ViewController. This method you can pass any kind of data from FCM to respective ViewController.

Hope this helps you.


Monday, February 20, 2017

Stop User From Uninstalling Your Mobile App

I have been developing mobile applications since last 5 years and over this period of time I have developed many applications for Android and iOS. These applications includes both native and hybrid applications. In this blog I am going to explain certain important things you should consider while developing mobile app so users won't uninstall after using it. These is based on my own experience of developing mobile applications. You may have other views on this. Let me know your views in comments.

Do not increase size of your mobile application


This is first and foremost factor you have to consider while developing mobile application. Now a days storage is biggest concern in smart phones. You have so much other data like photos, videos, musics etc. So at most of the time you get waring of "Storage space running low" at this time users will uninstall mobiles apps which is taking too much space. So if your mobile application is heavy in size and consume lots of spaces on your mobile phone at one point of time, users will going to uninstall your application so make sure you keep size of your application to some limits. Make sure you store data in SD cards so that your application does not consume much size. Try to clean up storage space from the app so that you do not have unnecessary data.

Real Life Story : Let me give you an example on how we reduced size of mobile app. In one of the app we need to have text to speech function. There is a lesson and user can play audio of that lesson and can hear it. So we decided to use in built text to speech function of android so we don't have to include MP4 files of audios.

Make it efficient to consume less data and battery


People now a days are very conscious about their phones, they can not live without it so they make sure that there is always active data connection and mobile battery is always charged. In this case if your application is consuming too much data and battery and your user has to charge it very often then there is high chance that they will uninstall your application. So make sure if you have functions like background services, GPS , location tracking, you also have strategy to save battery power. Always use power saving strategy. At the same time make sure your application is not using too much network data.

Real life story : We created mobile app to background location tracking. First we were tracking user location each 10 seconds for very accurate tracking but battery of mobile phone was always drained so later we changed location strategy and tracked user location based on considerable movements and at regular time interval of 5 minutes and used network locations as well.


Make sure they understand application


This problem is particularly with business applications where users of mobile app have difficulties in understanding functions of the app. They do not understand the flow and screens of the app and hence they get confused and stop using application. This rate is very high in business app and business app comes with strict requirements and flow as per each business and users have to understand it. To solve this problem you can include tutorials in your mobile application. You can use overlay tutorials on your mobile application screens to point out functions of each buttons and screens so user will know where to tap and what's the flow of the app.


Make sure application is bug free and do not crash often


If your application crashes often and have bugs your user is going to be annoyed with your app and will uninstall your application so make sure your application is bug free and do not crash. Although most of the developers will make their application bug free but still sometimes it happens that your mobile app crashes due to some reasons and no user will like it. So make sure you handle all the errors and exception properly.


Allow user to remove Ads


Well, the ultimate aim of the mobile application is to generate revenue from it and for that most of the users will put ads in the mobile app but sometimes these ads are annoying for end users. Specifically the ads which pop ups suddenly and stops users from doing work with app. Specifically for the games user will not like ads if it is not letting them play games properly so user will uninstall mobile app if you not allow them to remove ads. So yes you can add the ads in mobile app but let user remove it for the session while they are using the application. So they can hide it temporarily and use your app. 

Along with these there are some small tips you can also consider. 

  • Do not annoy user with too much notifications
  • Make UI very fast and responsive
  • Choose color scheme properly
  • Make it responsive to fit in all the screens
  • Do not use big images


If you consider these factors while developing your app user will not uninstall your app. 

Saturday, January 21, 2017

Xcode 8.2 Simulator Crash When Save Screen Shot - Alternate way to take Screenshot of iPhone simulator

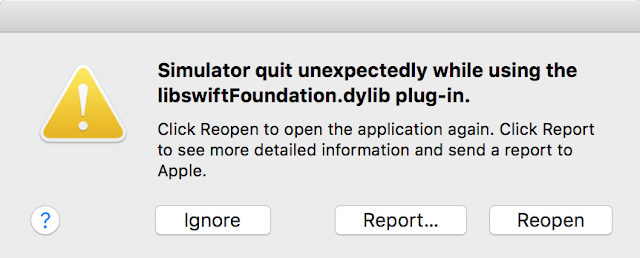
I don't know what went wrong with my Xcode. Recently I was publishing an app in iTunes connect and for that I needed iPhone 7 screen shot. I opened simulator and run and app and tried to capture screenshot with Command + S and it crashed the simulator with following error and screen shot file was empty.


It shows some error related to some library of SwiftFoundation. I was not sure about this error. So first thing what I did is report it to apple and then tried few things like. Restarting simulator couple of times and restarting Xcode couple of times. But it didn't work. So may be it's related to SDK update. I updated the latest SDK but still it was not working. So at last I give it to Apple to solve the problem but I needed that screen shot. So here is alternate way to take Screenshot of iPhone simulator.

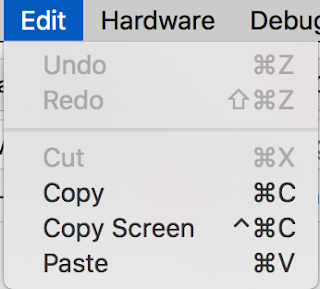
With simulator running. Select Go to Edit menu and Select Copy Screen.


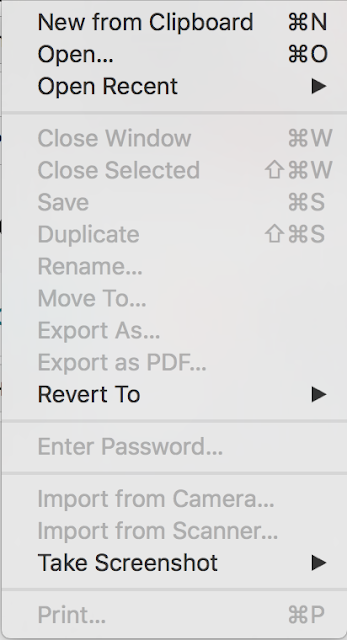
This will copy current screen of simulator. Now open the preview and go to File and Select New From Clipboard.


And it will give you new image with copied screen of your simulator, now save it and use it with Preview. Hope this helps you.

Saturday, January 14, 2017

AVCaptureVideoPreviewLayer Black Screen. AVfoundation Black Screen on Record

Recently in one of my project we used AVFoundation to record video. In some of the iOS devices, we were getting issue that on start recording, it shows black screen and video is not recorded. After some investigation I found out that it's because user has manually revoked camera access from settings so it was not woking. So to solve this issue, you must check if the permission is there or not. If not first request permission and if it's denied, so message to user.

So here is the function you should use. You should call this function, before you start recording and check if there is necessary permission.

- (void)requestCameraPermissionsIfNeeded {
   
    NSLog(@"requestCameraPermissionsIfNeeded");
    // check camera authorization status
    AVAuthorizationStatus authStatus = [AVCaptureDevice authorizationStatusForMediaType:AVMediaTypeVideo];
    switch (authStatus) {
        case AVAuthorizationStatusAuthorized: { // camera authorized
            NSLog(@"requestCameraPermissionsIfNeeded camera authorized");
            // do camera intensive stuff
        }
            break;
        case AVAuthorizationStatusNotDetermined: { // request authorization
            NSLog(@"requestCameraPermissionsIfNeeded have to ask user again");
            [AVCaptureDevice requestAccessForMediaType:AVMediaTypeVideo completionHandler:^(BOOL granted) {
                dispatch_async(dispatch_get_main_queue(), ^{
                   
                    if(granted) {
                        // do camera intensive stuff
                    } else {
                       
                        NSLog(@"STOP RECORDING");
                        WeAreRecording = NO;
                        ShareVideo = YES;
                        [MovieFileOutput stopRecording];
                        //Prompt message to user.
                    }
                });
            }];
        }
            break;
        case AVAuthorizationStatusRestricted:{
            NSLog(@"STOP RECORDING");
            WeAreRecording = NO;
            ShareVideo = YES;
            [MovieFileOutput stopRecording];
            //Prompt message to user.
        }
           
        case AVAuthorizationStatusDenied: {
            NSLog(@"STOP RECORDING");
            WeAreRecording = NO;
            ShareVideo = YES;
            [MovieFileOutput stopRecording];
            //Prompt message to user.
            dispatch_async(dispatch_get_main_queue(), ^{
            });
        }
            break;
        default:
            break;
    }
}


This will help you in identifying issue and display proper message to user.

Monday, January 9, 2017

10 Years of iPhone

Today is the one of the historical day for IT industry. Ten years ago today, on Jan. 9, 2007, Apple co-founder Steve Jobs, unveiled the product that would drive Apple to become the most valuable company in the world and cement Apple’s comeback as the greatest in business history. At the Macworld conference in San Francisco, he unveiled the iPhone.


Here is his Key note speech, in which he introduced iPhone.


Off course there was something crazy about iPhone. It changed mobile industry entirely and introduced Mobile Application economy with introduction of App Store, where developers can upload their apps and can make money. That created entire new opportunities for mobile application developers. Since it's introduction there are number of versions of iPhone are introduced with exciting features and cool UI display.

Being a mobile application developer I daily work with iOS devices and also other mobile devices here are some points which I feel are very spacial in iPhone.

Very Stable OS and Hardware support


Being a mobile application developer I work with both android and iOS devices but at one point every developer has to struggle with android while dealing with hardwares such as camera or SD card or any other native features. While in iPhone this is usually not the case because it has stable SDK and hardware which are manufactured by only Apple so we don't see much changes and customizations. While in case of android, since it's an open source operating system all the phone manufactures have changed it and customized it as per their platform. So face bit of problems while working with hardware. One app working without any issue in one phone may not work in other phone. While in case of iPhone, app will work all the devices and all the iOS versions.


Nice Development tools like Xcode IDE and Simulators


This is another advantage iOS development we have very stable Xcode IDE and iOS simulators using which we can develop applications very easily. In most of the cases you don't need real devices. Using simulators you can easily develop and test apps and launch in apple store. Xcode is not changed much since it's introduction and it's very easy to use, yes with the introduction of Swift, we have to learn new languages not but that's ok, that change is good.


It's not like iPhone is good in all the cases, there are some drawbacks.

Tooooo Expensive


This is first and foremost drawback for mobile application developer. Some features if you want to test like push notifications or cameras, that will work only in real devices and you have to buy it and it's too expensive for the developers. Developers can hardly afford one or two devices not more than that. Due to which sometime it gets hard to test some apps. As a mobile app developer I am still dreaming of having my own iPhone since years but I didn't manage to get it yet.

Bit Complex Testing Process and Publication Process


Compare to android, testing and publication process is bit complex in case of iOS. For Android you can share APK with any android devices and it can be installed and tested easily. While in case of iPhone, you need  apple developer account and create developer certificate and provisioning profile and register device Ids and upload app for testing and get it approved before you can send it to someone for testing using TestFight. Also to publish the app in market, you have to maintain some standards in case of UI and features, otherwise it's possible that your app may be rejected by app store and you have to redo again and make changes and republish app.


In short being a developer sometimes iPhone looks like blessing and sometime we feel that

Life Was Much Easier When Apple And Blackberry Were Just Fruits


Here is one funny video about it, Have fun and happy coding.


Sunday, January 8, 2017

Cordova FacebookConnect Plugin Not Working in iOS 9 and iOS 10

Recently in one of my Cordova project we have Connect with Facebook functionality where I have faced certain issues to make it working in iOS 9 and iOS 10 so in this blog I am going to explain those issues and how to resolve it.

1) Which Plugin to Use

There are two plugins if you search for Cordova Facebook Plugin. Following are two links.

GitHub - Wizcorp/phonegap-facebook-plugin

GitHub - jeduan/cordova-plugin-facebook4

The first plugin is older one and it works good till iOS 7 and iOS 8 and cordova 4.0 iOS but it does not work for iOS 10 and Cordova 6.0. If you use that plugin you will usually get issues like you will not be redirected to Facebook in mobile safari or after authentication, it come back to your app and nothing happen.

So my recommendation is to go for second Plugin, which works fine with latest cordova and iOS 9 and iOS 10.

2) After authentication, it come back to your app and nothing happen.

This issue is observed in iOS 9 and iOS 10 for both the plugins. That's because of LSApplicationQueriesSchemes introduced in iOS 9 on words.

There are two URL-related methods available to apps on iOS that are effected: canOpenURL and openURL. These are not new methods and the methods themselves are not changing. As you might expect from the names, “canOpenURL” returns a yes or no answer after checking if there is any apps installed on the device that know how to handle a given URL. “openURL” is used to actually launch the URL, which will typically leave the app and open the URL in another app.

Up until iOS 9, apps have been able to call these methods on any arbitrary URLs. Starting on iOS 9, apps will have to declare what URL schemes they would like to be able to check for and open in the configuration files of the app as it is submitted to Apple. This is essentially a whitelist that can only be changed or added to by submitting an update to Apple.

So you have to WhiteList all the Facebook App Schemes in your info.plist file. Following are schemes you have to add.

<key>LSApplicationQueriesSchemes</key>
<array>
    <string>fbapi</string>
    <string>fbapi20130214</string>
    <string>fbapi20130410</string>
    <string>fbapi20130702</string>
    <string>fbapi20131010</string>
    <string>fbapi20131219</string>  
    <string>fbapi20140410</string>
    <string>fbapi20140116</string>
    <string>fbapi20150313</string>
    <string>fbapi20150629</string>
    <string>fbapi20160328</string>
    <string>fbauth</string>
    <string>fbauth2</string>
    <string>fb-messenger-api20140430</string>
</array>

3) There was an error making the graph call

I spent almost an hour to solve this issue. Everything was configured but when I try to make graph API call to get basic profile, it fails every time and the reason behind this was in graph api call IO have space after each field.

facebookConnectPlugin.api("me/?fields=id, first_name, last_name, email",["public_profile"],
function (result) {
},
function (error) {
});

As you can see above there was a space after each field. So to make it working. Remove that space. It does not affect in Android but it does not work in iOS.

facebookConnectPlugin.api("me/?fields=id,first_name,last_name,email",["public_profile"],
function (result) {
},
function (error) {
});

Monday, December 19, 2016

Cordova Upload PDF File

Recently in my project I created Hybrid application using Cordova. There was a requirement where we allow user to choose PDF file or any type of file and upload it to server.

So here are two parts, first let user choose file from SD card or phone memory or from iCloud drive on iOS.

Second part is to upload file to server with progress and store it and get it's path back in case if you want to show it some where. I will show example code on server side.

So lets first check the first part. For this we need following plugins. Please install it first.

https://github.com/jcesarmobile/FilePicker-Phonegap-iOS-Plugin This is specifically for iOS
https://github.com/don/cordova-filechooser This is specifically for Android
https://github.com/apache/cordova-plugin-file
https://github.com/apache/cordova-plugin-file-transfer

The file picker iOS plugin which I have mentioned here will not work for local photos and videos stored in camera roll. For this you have to make certain changes in the plugin. I have mentioned this in my previous blog. Please read it here.

http://davehiren.blogspot.com/2016/12/filepicker-cordova-ios-plugin-get-files.html

Now first lets invoke the plugin.

Android Example

fileChooser.open(function(obj) {
        var filePath = obj.path;
});

iOS Example

FilePicker.pickFile(function(obj) {
        obj = obj[0];
         var filePath = obj.path;
});

In both of this case we will get absolute path of files like

/path/of/file/filename.extension

Now we will have our logic to upload file to server using Cordova File Transfer plugin.

First of all we will get extension of file and keep it separate also we will have file name extracted from the path to send it to server.

var fileType = filePath.substring(obj.path.lastIndexOf('.'));

var options = new FileUploadOptions();
options.fileKey = "file";
options.fileName = filePath.substr(this.evidencePath.lastIndexOf('/') + 1);
options.mimeType = "text/plain";

var params = {};
params.fileType = type;
options.params = params;

var ft = new FileTransfer();

ft.onprogress = function(progressEvent) {
if (progressEvent.lengthComputable) {
//in case you want to show progress bar , your code goes here.
} else {
//loadingStatus.increment();
}
};

var win = function (r) {
        //success alert or your logic after successful upload
};

var fail = function (error) {
        //failure alert or your logic after successful upload
};

ft.upload(fileURI, encodeURI("http://pathtoyourserver"), win, fail, options);

So this was on JavaScript side. Now lets see on server side. I used PHP on server side so I will give you example of that. If you are using something else on server side, please implement your own logic.

$file_type = $_POST['fileType'];
$fileName = time()."_".$file_type;
move_uploaded_file($_FILES["file"]["tmp_name"], "/your/server/path/".$fileName);
return json_encode(array('success'=>true, 'server_path'=>'http://yourserverpath.com'.$fileName));

With this logic you can upload any type of file from your cordova app.

Objective C - Record Video With AVCaptureSession

Hello,

In this blog I am going to explain how to record video with AVCaptureSession in your iOS application.

First of all add following import statements in your view controller header file.

#import <Foundation/Foundation.h>
#import <CoreMedia/CoreMedia.h>
#import <AVFoundation/AVFoundation.h>
#import <AVKit/AVKit.h>
#import <AVFoundation/AVFoundation.h>
#import <AssetsLibrary/AssetsLibrary.h>

Now we will have to set preview layer for the recording in our view and also we will need input device and output file location. Also we need to add AVCaptureFileOutputRecordingDelegate to have notifications of events like recording stop.

Implement this delegate in your header file.

@interface MainViewController : CDVViewController
{
    BOOL WeAreRecording;
    BOOL ShareVideo;
    AVCaptureSession *CaptureSession;
    AVCaptureMovieFileOutput *MovieFileOutput;
    AVCaptureDeviceInput *VideoInputDevice;
}

Now we will set preview layer and init AVCaptureSession in viewDidLoad and set input and output.

CaptureSession = [[AVCaptureSession alloc] init];
AVCaptureDevice *VideoDevice = [AVCaptureDevice defaultDeviceWithMediaType:AVMediaTypeVideo];
AVCaptureDevice *audioCaptureDevice = [AVCaptureDevice defaultDeviceWithMediaType:AVMediaTypeAudio];
NSError *error = nil;
AVCaptureDeviceInput *audioInput = [AVCaptureDeviceInput deviceInputWithDevice:audioCaptureDevice error:&error];
if (audioInput)
{
[CaptureSession addInput:audioInput];
}

[self setPreviewLayer:[[AVCaptureVideoPreviewLayer alloc] initWithSession:CaptureSession]];
PreviewLayer.orientation = AVCaptureVideoOrientationLandscapeRight;
[[self PreviewLayer] setVideoGravity:AVLayerVideoGravityResizeAspectFill];

Now we will setup output file and video recording settings and image quality.

MovieFileOutput = [[AVCaptureMovieFileOutput alloc] init];
Float64 TotalSeconds = 60;
int32_t preferredTimeScale = 30;
CMTime maxDuration = CMTimeMakeWithSeconds(TotalSeconds, preferredTimeScale);
MovieFileOutput.maxRecordedDuration = maxDuration;
MovieFileOutput.minFreeDiskSpaceLimit = 1024 * 1024;
   
if ([CaptureSession canAddOutput:MovieFileOutput])
    [CaptureSession addOutput:MovieFileOutput];
   
[self CameraSetOutputProperties];

[CaptureSession setSessionPreset:AVCaptureSessionPresetMedium];
if ([CaptureSession canSetSessionPreset:AVCaptureSessionPreset640x480])
    [CaptureSession setSessionPreset:AVCaptureSessionPreset640x480];
   
CGRect layerRect = [[[self view] layer] bounds];
CGRect viewBoundsPreview = [self.webView bounds];
viewBoundsPreview.origin.y = 20;
viewBoundsPreview.size.height = viewBoundsPreview.size.height - 40;
[PreviewLayer setBounds:viewBoundsPreview];
[PreviewLayer setPosition:CGPointMake(CGRectGetMidX(layerRect),
 CGRectGetMidY(layerRect))];

UIView *CameraView = [[UIView alloc] init];
[[self view] addSubview:CameraView];
[self.view sendSubviewToBack:CameraView];
[[CameraView layer] addSublayer:PreviewLayer];
[CaptureSession startRunning];

Now capture session is running, we have to start and stop recording.

To start recording, add following code to your handler.

NSTimeInterval timeStamp = [[NSDate date] timeIntervalSince1970];
NSNumber *timeStampObj = [NSNumber numberWithInteger:timeStamp];
NSString* fileName = [timeStampObj stringValue];
fileName = [fileName stringByAppendingString:@".mov"];
NSString *outputPath = [[NSString alloc] initWithFormat:@"%@%@", NSTemporaryDirectory(), fileName];
NSURL *outputURL = [[NSURL alloc] initFileURLWithPath:outputPath];
NSFileManager *fileManager = [NSFileManager defaultManager];
if ([fileManager fileExistsAtPath:outputPath])
{
NSError *error;
if ([fileManager removeItemAtPath:outputPath error:&error] == NO)
{
//Error - handle
}
}
//Start recording
[MovieFileOutput startRecordingToOutputFileURL:outputURL recordingDelegate:self];


Above code will start recording. Add following code to stop recording.

[MovieFileOutput stopRecording];

This will stop recording and save video to Photos library.

Friday, December 16, 2016

Objective C - Play Video From Application Temp Folder

Recently in one of my iOS project , there was requirement to play Video stored in temporary folder of Application data. After some hours of struggle I managed to get it working.

So the problem I was facing is I have absolute URL of the video that I was trying to play in MPMoviePlayerController but it was not working as the player was displayed for couple of seconds and it's dismissed automatically and there was a black screen.

So after sometime I found out that MPMoviePlayerController is deprecated, instead of it we shall use AVPlayer and that too was not working if I give absolute path to initialize a player. So first of all I just extracted file name fro the absolute path will following code.

NSRange range = [filePath rangeOfString:@"/" options:NSBackwardsSearch];
NSUInteger index = range.location;      
filename = [filePath substringFromIndex:index+1];

Now we will initialize player. Please note you have to import AVKIt first in your header file.

#import <AVKit/AVKit.h>

Now initialize player.

NSString *outputPath = [NSTemporaryDirectory() stringByAppendingPathComponent:filename];
AVAsset *asset = [AVAsset assetWithURL:[NSURL fileURLWithPath:outputPath]];
AVPlayer *_avPlayer = [[AVPlayer alloc]initWithPlayerItem:[[AVPlayerItem alloc]initWithAsset:asset]];

movieLayer = [AVPlayerLayer playerLayerWithPlayer:_avPlayer];
movieLayer.frame = self.view.bounds;
[self.view.layer addSublayer:movieLayer];

So player will be added as sublayer on the view so we have to dismiss it when video finished playing.

[[NSNotificationCenter defaultCenter] addObserver:self
selector:@selector(videoDidFinish:)
name:AVPlayerItemDidPlayToEndTimeNotification
  object:[_avPlayer currentItem]];

And add callback function to remove player layer.

- (void)videoDidFinish:(id)notification
{
    NSLog(@"finsihed");
    [movieLayer removeFromSuperlayer];
    [[NSNotificationCenter defaultCenter] removeObserver:self];
}


That's it. Hope this will help you.

FilePicker Cordova iOS Plugin - Get Files From Photos

Hello,

Recently in one of my iOS project we have requirement to let user browse and select files. So we needed FilePicker plugin for iOS. It should also allow user to browse through document providers like iCloud drive, Dropbox or Google drive.


So after searching for the plugin I found following plugin which works fine for iCloud drive.


https://github.com/jcesarmobile/FilePicker-Phonegap-iOS-Plugin


I would like to thank developer of above plugin as I just added more code to it to fulfill my requirement.

But my other requirements were not fulfilled to pick up photos and videos from saved photos album so I made some changes in this plugin. Here in this blog I will explain how to do this.

First of all install above plugin through command line and open your project in Xcode and open file

Plugins ==> FilePicker.h and Plugins ==> FilePicker.m

This plugin shows pop over menu with all available document providers so first we have to add option to browse photos and videos.

Open FilePicker.h file and add following import statement.

#import

And add following delegates.

@interface FilePicker : CDVPlugin

Now Open FilePicker.m file and find displayDocumentPicker and add following code to it.

[importMenu addOptionWithTitle:@"Photos & Videos" image:nil order:UIDocumentMenuOrderFirst handler:^{
        
UIImagePickerController *imagePickerController = [[UIImagePickerController alloc] init];
imagePickerController.sourceType = UIImagePickerControllerSourceTypeSavedPhotosAlbum;
imagePickerController.mediaTypes = [UIImagePickerController availableMediaTypesForSourceType:imagePickerController.sourceType];
imagePickerController.allowsEditing = NO;
imagePickerController.videoQuality = UIImagePickerControllerQualityTypeHigh;
imagePickerController.delegate = self;
[self.viewController presentViewController:imagePickerController animated:YES completion:nil];

}];


This will add menu and we set delegate to self so now we have to callback functions. Add following function in the file.

- (void)imagePickerController:(UIImagePickerController *)picker didFinishPickingMediaWithInfo:(NSDictionary *)info {
    NSString *mediaType = [info objectForKey:UIImagePickerControllerMediaType];
    if ([mediaType isEqualToString:@"public.image"]){
        NSData *imageData = UIImagePNGRepresentation((UIImage*) [info objectForKey:UIImagePickerControllerOriginalImage]);
        NSString* size = [NSString stringWithFormat:@"%li",  (unsigned long)[imageData length]];
        NSTimeInterval timeStamp = [[NSDate date] timeIntervalSince1970];
        NSNumber *timeStampObj = [NSNumber numberWithInteger:timeStamp];
        NSString* fileName = [timeStampObj stringValue];
        
        NSArray *paths = NSSearchPathForDirectoriesInDomains(NSDocumentDirectory, NSUserDomainMask, YES);
        NSString *documentsDirectory = [paths objectAtIndex:0];
        NSString *imagePath =[documentsDirectory stringByAppendingPathComponent:[NSString stringWithFormat:@"%@.png",fileName]];
        if (![imageData writeToFile:imagePath atomically:NO])
        {
            //send failure response;
            self.pluginResult = [CDVPluginResult resultWithStatus:CDVCommandStatus_ERROR messageAsString:@"Failed to cache image data to disk"];
            [self.pluginResult setKeepCallbackAsBool:NO];
            [self.commandDelegate sendPluginResult:self.pluginResult callbackId:self.command.callbackId];
        }
        else
        {
            NSArray *arr = @[
                             @{@"path": imagePath, @"size": size}
                             ];
            
            self.pluginResult = [CDVPluginResult resultWithStatus:CDVCommandStatus_OK messageAsArray:arr];
            [self.pluginResult setKeepCallbackAsBool:NO];
            [self.commandDelegate sendPluginResult:self.pluginResult callbackId:self.command.callbackId];
        }
    }
    else if ([mediaType isEqualToString:@"public.movie"]){
        NSURL *videoURL = [info objectForKey:UIImagePickerControllerMediaURL];
        NSString* path = [[videoURL absoluteString] substringFromIndex:7];
        NSData *data = [NSData dataWithContentsOfURL:videoURL];
        NSString* size = [NSString stringWithFormat:@"%li",  (unsigned long)[data length]];
        NSArray *arr = @[
                         @{@"path": path, @"size": size}
                         ];
        
        self.pluginResult = [CDVPluginResult resultWithStatus:CDVCommandStatus_OK messageAsArray:arr];
        [self.pluginResult setKeepCallbackAsBool:NO];
        [self.commandDelegate sendPluginResult:self.pluginResult callbackId:self.command.callbackId];
    }
    [picker dismissViewControllerAnimated:YES completion:NULL];
}

So as you can see in above code we are checking if picked media is image, then first we have to move application temp storage as iOS does not allow you to access assets directly from photos so we are making a copy with following code.

NSData *imageData = UIImagePNGRepresentation((UIImage*) [info objectForKey:UIImagePickerControllerOriginalImage]);
NSString* size = [NSString stringWithFormat:@"%li",  (unsigned long)[imageData length]];
NSTimeInterval timeStamp = [[NSDate date] timeIntervalSince1970];
NSNumber *timeStampObj = [NSNumber numberWithInteger:timeStamp];
NSString* fileName = [timeStampObj stringValue];

NSArray *paths = NSSearchPathForDirectoriesInDomains(NSDocumentDirectory, NSUserDomainMask, YES);
NSString *documentsDirectory = [paths objectAtIndex:0];
NSString *imagePath =[documentsDirectory stringByAppendingPathComponent:[NSString stringWithFormat:@"%@.png",fileName]];
if (![imageData writeToFile:imagePath atomically:NO])
{
}
else
{
}


And for the videos we are sharing absolute URL to result callback. Also the plugin result is now array with path and size attribute. So we have to change the code of plugin to send same result for other document providers. Find out following function in FilePicker.m file.

- (void)documentPicker:(UIDocumentPickerViewController *)controller didPickDocumentAtURL:(NSURL *)url

And replace it with following function.

- (void)documentPicker:(UIDocumentPickerViewController *)controller didPickDocumentAtURL:(NSURL *)url {
    
    [url startAccessingSecurityScopedResource];
    __block NSData *pdfData = nil;
    
    NSFileCoordinator *coordinator = [[NSFileCoordinator alloc] init];
    __block NSError *error;
    [coordinator coordinateReadingItemAtURL:url options:0 error:&error byAccessor:^(NSURL *newURL) {
        pdfData = [NSData dataWithContentsOfURL:newURL];
        NSString* size = [NSString stringWithFormat:@"%li",  (unsigned long)[pdfData length]];
        NSArray *arr = @[
                         @{@"path": [url path], @"size": size}
                         ];
        
        self.pluginResult = [CDVPluginResult resultWithStatus:CDVCommandStatus_OK messageAsArray:arr];
        [self.pluginResult setKeepCallbackAsBool:NO];
        [self.commandDelegate sendPluginResult:self.pluginResult callbackId:self.command.callbackId];
    }];
    [url stopAccessingSecurityScopedResource];
    
}

So in JavaScript, following code should work.

FilePicker.pickFile(function(obj) {
alert(obj[0].path);
alert(obj[0].size);
}

Hope this helps you.

Saturday, December 10, 2016

Cordova Application Hanging During Startup on iOS 10

Hello,

If you have any cordova application in iTunes, you may have faced this issue since launch of iOS 10,. Either your app hangs at Start up or it will hang in case when there is a use of any plugin, like camera or location or any other native features. 

This is because of content security policy. iOS 10 needs content security policy where you have to mention what types of content you will allow to load.

As you have notice cordova plugins are invoked gap:// and in iOS 10 it's not allowed by default so you have to mention this in content security policy. 

Add following line in head section of your index.html file.

<meta http-equiv="Content-Security-Policy" content="media-src *; img-src * data:; font-src * data:; default-src  * gap:; style-src * 'unsafe-inline'; script-src * 'unsafe-inline' 'unsafe-eval'">


As you can see we have added gap: in allowed content src along with other source, now your app will work normally in iOS 10.

Hope this helps you.

Thursday, December 8, 2016

5 Simple Questions To Decide Hybrid vs Native Mobile App Development


If you’re confused and wondering whether to build a hybrid mobile app or a native mobile app, this article will help you decide the mobile app strategy.

Quick introduction to Hybrid and Native app

Hybrid App: Developer wraps web code (HTML / CSS / JavaScript) with native SDK. Can be easily deployed across multiple platform and is usually the cheaper and faster solution.

Native App: This is platform (iOS, Android etc.) specific and requires unique expertise. However the full potential of the platform can be leveraged which will drive great user experience and larger app capabilities (especially around phone hardware).

Following 5 simple questions will help you decide between Hybrid vs Native App Development.

1) Do you want to use Hardware and Native Features.

In your application if you want to use phone hardware like GPS, Camera, SD card etc, it's recommended to go for native app instead of hybrid app. Because native SDK has support to access hardware, For hybrid app depending on the framework, you may or may not hardware access. Also you have to consider performance as well. For example in one my project there was a requirement to get camera preview in the app and capture it. Initially I build hybrid app but camera preview was sluggish and slow so later I have to move to native app. If there is no requirement to access hardware then hybrid application is the best option.

2) Is the UI experience is more important in your application?

If you want to create an insane user experience, the native app approach would do better. A hybrid app can never match the level of user experience that you get in a native app. However, this doesn’t mean that the user experience of a hybrid app is bad. A good front-end developer in hybrid app can get close to a native experience. Also performance of native app is much better than hybrid app so when there is a high demand of performance, go for native app.

3) Does your app need background services?

If your application need to work in background like background location tracking, file download in background then native app is the best option as native SDK has classes to create background services that can be invoked by alarms etc. In hybrid app, if app is background or killed, all the process stops.

4) What is your Development Time and Budget?

If you have very limited budget and want to get app quickly to the market then hybrid app is the best option as you don't have to create separate application for each platform. One single code wrapped with multiple native wrappers will give you native application for different platform so it will save both time and cost. As for the single native app you have to hire native developers, while for hybrid app one developer is enough and it can be quickly developed and deployed to multiple platform.

5) Does your application need offline storage?

Most of the apps are built work offline and for this we need local database storage in app. If your application need more space for offline storage than native app is best option. However it's possible to have offline storage in hybrid app too. But there is a limitation up to certain MB. After that it does not allow more offline storage.


With these 5 questions you can define your development strategy.

Saturday, January 2, 2016

Resolve App Transport Security Exceptions in iOS 9 and OSX 10.11

Hello,

Recently I was working on an old iOS application for my client. This app was developed on iOS 7 and we were adding few updates, I was using iOS 9 SDK on my Xcode. While development I found that none of the web services were working on app. In short app was not able to get data from remote URLs. I show the logs and there was App Transport Security Exception.

Let's first understand what is App Transport Security (ATS).

At WWDC 2015, Apple announced “App Transport Security” for iOS 9 and OSX 10.11 El Capitan. The “What’s New in iOS” guide for iOS 9 explains:

App Transport Security (ATS) lets an app add a declaration to its Info.plist file that specifies the domains with which it needs secure communication. ATS prevents accidental disclosure, provides secure default behavior, and is easy to adopt. You should adopt ATS as soon as possible, regardless of whether you’re creating a new app or updating an existing one.

If you’re developing a new app, you should use HTTPS exclusively. If you have an existing app, you should use HTTPS as much as you can right now, and create a plan for migrating the rest of your app as soon as possible.

In simple terms, this means that if your application attempts to connect to any HTTP server (in this example, yourserver.com) that doesn’t support the latest SSL technology (TLSv1.2), your connections will fail with an error like this:

CFNetwork SSLHandshake failed (-9801)
Error Domain=NSURLErrorDomain Code=-1200 "An SSL error has occurred and a secure connection to the server cannot be made." UserInfo=0x7fb080442170 {NSURLErrorFailingURLPeerTrustErrorKey=, NSLocalizedRecoverySuggestion=Would you like to connect to the server anyway?, _kCFStreamErrorCodeKey=-9802, NSUnderlyingError=0x7fb08055bc00 "The operation couldn’t be completed. (kCFErrorDomainCFNetwork error -1200.)", NSLocalizedDescription=An SSL error has occurred and a secure connection to the server cannot be made., NSErrorFailingURLKey=https://yourserver.com, NSErrorFailingURLStringKey=https://yourserver.com, _kCFStreamErrorDomainKey=3}

In short app should have all the remote calls with Https protocol. How ever in my case it was not possible as my client refused to install SSL certificate. So I have to bypass App Transport Security.

So here how to do this. Open your project in Xcode and open info.plist file and add following key.

App Transport Security Settings


Now add one more key under that key which you added above. Following is the name of key.

Allow Arbitrary Loads and set it's value to YES. After adding both keys your info.plist should look as below.


That's it and now all your services should work with http protocols.


Send Apple Push Notifications (APN) from PHP Web Application

Hello,

In this blog I am going to explain how to configure your PHP server to send Apple Push Notifications (APN). Please note you will need a valid apple developer account for this.

First of all you will need a PEM file on your server. Following are the steps to create PEM file. Log into apple member center with your developer account credentials.

https://developer.apple.com/membercenter/index.action

Go to Certificates, Identifies & Profiles

Select iOS Apps - > Certificates

We will see how to create both development and production PEM file. Click on + sign on top right corner to add new certificate. It will show you list of certificate types.


Choose from development if you want development certificate or choose from production if you want production certificate. Click on Next and it will ask you to select your application in next step.


Select your desired application and click on next. Now you have to upload certificate signing request. Following are steps to generate certificate signing request


  • Open Keychain Access on your Mac (located in Applications/Utilities).
  • Open Preferences and click Certificates. Make sure both Online Certificate Status Protocol and Certificate Revocation List are set to Off.
  • Choose Keychain Access > Certificate Assistant > Request a Certificate From a Certificate Authority.
  • Note: If you have a private key selected when you do this, the CSR won’t be accepted. Make sure no private key is selected. Enter your user email address and common name. Use the same address and name as you used to register in the iOS Developer Program. No CA Email Address is required.
  • Select the options “Saved to disk” and “Let me specify key pair information” and click Continue.
  • Specify a filename and click Save.

Upload CSR in the following screen and click on continue.


In the next step click on generate and it will generate your certificate. Download certificate to your local machine and double click on it and it will be added to key chain access and it will open and should show you following screen.


As you can see above development certificates are added as Apple Development iOS Push Services and Production certificate are added as Apple Push Services. Now click on left arrow and expand it. You will see name of certificate signing authority there. Select both name and certificate and double tap on it it will show you following menu.


Click on export two items and save .p12 file.


Now we will convert .p12 file to .pem file using OpenSSL. Open your terminal and run following command.

openssl pkcs12 -in Certificates.p12 -out Certificates.pem -nodes -clcerts

That's it your pem file is ready. Upload it your server and add following functions to send APNs for production and development respectively in your PHP.

public function sendAPNProduction($deviceToken, $msg, $message){

        $payload['aps'] = array('alert' => $msg, 'badge' => 1, 'sound' => 'default');
        $payload['messages'] = $message;
        $payload = json_encode($payload);

        $apnsCert = 'Certicates.pem';

        $streamContext = stream_context_create();
        stream_context_set_option($streamContext, 'ssl', 'local_cert', $apnsCert);

        $apns = stream_socket_client('ssl://gateway.push.apple.com:2195', $error, $errorString, 2, STREAM_CLIENT_CONNECT, $streamContext);

        $apnsMessage = chr(0) . chr(0) . chr(32) . pack('H*', str_replace(' ', '', $deviceToken)) . chr(0) . chr(strlen($payload)) . $payload;
        fwrite($apns, $apnsMessage);

        //socket_close($apns); seems to be wrong here ...
        fclose($apns);

}

public function sendAPNDevelopment($deviceToken, $msg, $message){

        $payload['aps'] = array('alert' => $msg, 'badge' => 1, 'sound' => 'default');
        $payload['messages'] = $message;
        $payload = json_encode($payload);

        $apnsCert = 'Certicates.pem';

        $streamContext = stream_context_create();
        stream_context_set_option($streamContext, 'ssl', 'local_cert', $apnsCert);

        $apns = stream_socket_client('ssl://gateway.sandbox.push.apple.com:2195', $error, $errorString, 2, STREAM_CLIENT_CONNECT, $streamContext);

        $apnsMessage = chr(0) . chr(0) . chr(32) . pack('H*', str_replace(' ', '', $deviceToken)) . chr(0) . chr(strlen($payload)) . $payload;
        fwrite($apns, $apnsMessage);

        //socket_close($apns); seems to be wrong here ...
        fclose($apns);

}

That's it and now your PHP web app is ready to send Apple Push Notifications (APNs). I hope this helps you.


Sunday, May 3, 2015

Add iOS in App Purchase to Your Cordova Application

Hello,

Recently I was working on cordova application where we have to add in app purchase in iOS. In this blog I am going to explain how to add in app purchase to cordova based application.

First of all open your MainViewController.m file and un comment following function.


- (BOOL) webView:(UIWebView*)theWebView shouldStartLoadWithRequest:(NSURLRequest*)request navigationType:(UIWebViewNavigationType)navigationType

As we are going to use above function to pass product id to native code from JavaScript with use of this function. Here is how to do this. From your JavaScript file add following code.

window.location.href = 'http://buyproduct.com?productId='+sku.toLowerCase();

This will invoke shouldStartLoadWithRequest delegate. Now in that delegate add following code.

NSURL *url = [request URL];
if([[url hostisEqual: @"buyproduct.com"]){
        NSString *queryString = url.query;
        NSArray* queryStringValues = [queryString componentsSeparatedByString: @"&"];
        NSString* productId = [[[queryStringValues objectAtIndex:0] componentsSeparatedByString: @"="] objectAtIndex:1];
       return NO;
}

This way we get product id in native code and since we returned NO in that delegate, webview will not invoke this url.

Now let's add required library to support in App Purchase. First select project from project explorer and select build phases tab. At bottom where we have linked libraries click on + sign and search for storekit. It will show following framework. Add this to project.


Now open MainViewController.h file and add necessary import statements and delegates. Copy following code.

#import
#import
#import
#import

@interface MainViewController : CDVViewController <SKProductsRequestDelegate, UIAlertViewDelegate, SKPaymentTransactionObserver>
@property (retain, nonatomic) SKProduct* fetchedProduct;
@end
@interface MainCommandDelegate : CDVCommandDelegateImpl
@end

@interface MainCommandQueue : CDVCommandQueue
@end

Now open MainViewController.m file and add necessary callbacks.

#pragma mark -
#pragma mark SKProductsRequestDelegate methods

- (void)productsRequest:(SKProductsRequest *)request didReceiveResponse:(SKProductsResponse *)response
{
    
}

- (void)alertView:(UIAlertView *)alertView clickedButtonAtIndex:(NSInteger)buttonIndex
{
    [[SKPaymentQueue defaultQueue] addTransactionObserver:self];
    SKPayment * payment = [SKPayment paymentWithProduct:fetchedProduct];
    [[SKPaymentQueue defaultQueue] addPayment:payment];
}

- (void)paymentQueue:(SKPaymentQueue *)queue updatedTransactions:(NSArray *)transactions
{
    for (SKPaymentTransaction * transaction in transactions) {
        switch (transaction.transactionState)
        {
            case SKPaymentTransactionStatePurchased:
                [self completeTransaction:transaction];
                break;
            case SKPaymentTransactionStateFailed:
                [self failedTransaction:transaction];
                break;
            case SKPaymentTransactionStateRestored:
                [self restoreTransaction:transaction];
            default:
                break;
        }
    };
}

- (void)completeTransaction:(SKPaymentTransaction *)transaction {
    
}

- (void)restoreTransaction:(SKPaymentTransaction *)transaction {
    NSLog(@"restoreTransaction...");
    //call javascript function to consume product only
    [[SKPaymentQueue defaultQueue] finishTransaction:transaction];
}

- (void)failedTransaction:(SKPaymentTransaction *)transaction {
    
    NSLog(@"failedTransaction...");
    if (transaction.error.code != SKErrorPaymentCancelled)
    {
        NSLog(@"Transaction error: %@", transaction.error.localizedDescription);
    }
    
    [[SKPaymentQueue defaultQueue] finishTransaction: transaction];
}

This are necessary functions to support transactions and product request. Now lets first request a product information. Go back to shouldStartLoadWithRequest and add following code at the end.

BOOL productPurchased = [[NSUserDefaults standardUserDefaults] boolForKey:productId];
        if (productPurchased) {
            //call javascript function to consume product
            [self.webView stringByEvaluatingJavaScriptFromString:@"consumePurchasedProduct();"];
        }else{
            SKProductsRequest *productsRequest = [[SKProductsRequest alloc] initWithProductIdentifiers:productIdentifiers];
            productsRequest.delegate = self;
            [productsRequest start];
        }

Here we are checking if product already purchased. If already purchased simply call JavaScript function to consume it else start product request. After we get product information we have to show it to user.  Add following code to productRequest delegate.

NSArray *products = response.products;
    fetchedProduct = [products count] == 1 ? [products firstObject] : nil;
    if (fetchedProduct)
    {
        NSLog(@"Product title: %@" , fetchedProduct.localizedTitle);
        NSLog(@"Product description: %@" , fetchedProduct.localizedDescription);
        NSLog(@"Product price: %@" , fetchedProduct.price);
        NSLog(@"Product id: %@" , fetchedProduct.productIdentifier);
        
        NSNumberFormatter *formatter = [[NSNumberFormatter alloc] init];
        [formatter setNumberStyle:NSNumberFormatterCurrencyStyle];
        [formatter setLocale:[NSLocale currentLocale]];
        NSString *localizedMoneyString = [formatter stringFromNumber:fetchedProduct.price];

        NSString *productPrice = @"Price : ";
        productPrice = [productPrice stringByAppendingString:localizedMoneyString];
        NSString* alertViewContent = fetchedProduct.localizedDescription;
        alertViewContent = [alertViewContent stringByAppendingString:@"\n \n"];
        alertViewContent = [alertViewContent stringByAppendingString:productPrice];
        UIAlertView * alert = [[UIAlertView alloc] initWithTitle:fetchedProduct.localizedTitle message:alertViewContent delegate:self cancelButtonTitle:@"Buy" otherButtonTitles:nil];
        [alert show];
    }

Above function will show alert like this with product information.


As you can see we have a buy button there. When user clicks on Buy it will call clickedButtonAtIndex function added in above code and it will start payment process. One payment is done it will call completeTransaction delegate. Add following code to it.

NSLog(@"completeTransaction...");
    [[NSUserDefaults standardUserDefaults] setBool:YES forKey:fetchedProduct.productIdentifier];
    //call javascript function to consume product
    [self.webView stringByEvaluatingJavaScriptFromString:@"consumePurchasedProduct();"];
    [[SKPaymentQueue defaultQueue] finishTransaction:transaction];

Here we are adding product to user defaults in case network got disconnected before user can consume product. In case of transaction failure other functions will be called.